Engineering drawings are usually created in accordance with standardized conventions for layout, nomenclature, interpretation, appearance (such as typefaces and line styles), size, etc. One such standardized convention is called GD&T.
Each field in the Fields of engineering will have its own set of requirements for the producing drawings in terms line weight, symbols, and technical jargon. Some fields of engineering have no GD&T requirements.
The purpose of such a drawing is to accurately and unambiguously capture all the geometric features of a product or a component. The end goal of an engineering drawing is to convey all the required information that will allow a manufacturer to produce that component.
Engineering drawings used to be created by hand using tools such as pencils, ink, straightedges, T-squares, French curves, triangles, rulers, scales, and erasers. Today they are usually done electronically with computer-aided design (CAD).
The drawings are still often referred to as "blueprints" or "bluelines", although those terms are anachronistic from a literal perspective, since most copies of engineering drawings that were formerly made using a chemical-printing process that yielded graphics on blue-colored paper or, alternatively, of blue-lines on white paper, have been superseded by more modern reproduction processes that yield black or multicolour lines on white paper. The more generic term "print" is now in common usage in the U.S. to mean any paper copy of an engineering drawing.
The process of producing engineering drawings, and the skill of producing them, is often referred to as technical drawing or drafting, although technical drawings are also required for disciplines that would not ordinarily be thought of as parts of engineering.


Introduction to Geometric Dimensioning and Tolerance
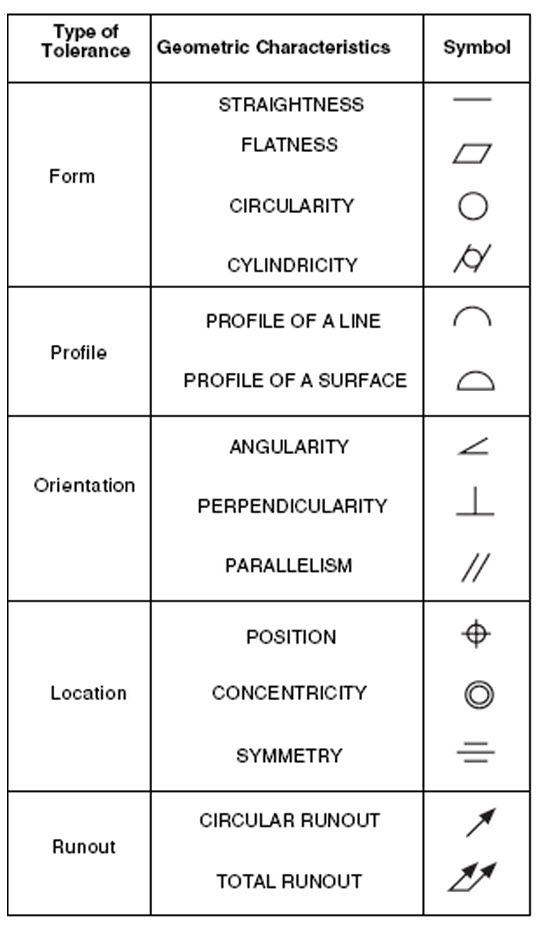
GD&T is a symbolic language. It is used to specify the size, shape, form, orientation, and location of features on a part. And its basically a design tool. To apply GD&T properly one must have a good understanding of parts functional requirement in an assembly. Let us start learn the language of symbols.
There are fourteen geometric characteristic symbols used in the language of GD&T. They are divided in to five categories namely form, orientation, location, runout, and profile.
In addition to above symbols there are five more modifying symbols used in GD&T.
We will discuss each of these symbols in detail on future chapters.
Let us now familiarize the feature control frame
Geometric dimensioning and tolerancing is applied on a drawing via these feature control frames. It’s a rectangle which is divided into compartments within which geometric characteristic symbol, tolerance value, modifiers, and datum references are placed. These feature control frames may attached below dimensions or to a datum reference or to a feature with a leader.
Let us now familiarize some of the common terms used in GD&T.
Basic Dimension
A basic dimension is a numerical value used to describe the theoretically exact size, profile, orientation, or location of a feature or datum target. Basic dimensions are used to define or position tolerance zones.
Datum
A datum is a theoretically exact point, line, or plane derived from the true geometric counterpart of a specified datum feature. A datum is the origin from which the location or geometric characteristics of features of a part are established.
Datum feature
A datum feature is an actual feature on a part used to establish a datum.
Feature
A feature is a physical portion of a part like hole, flat surface, ribs etc.
Feature of Size
A feature with size dimension, hole with diameter dimension is an example of feature of size.
Least Material Condition (LMC)
The least material condition of a feature of size is the least amount of material within the stated limits of size. For example, the minimum shaft diameter or the maximum hole diameter.
Maximum material condition (MMC)
The maximum material condition of a feature of size is the maximum amount of material within the stated limits of size, for example, the maximum shaft diameter or the minimum hole diameter.
True position
True position is the theoretically exact location of a feature established by basic dimensions. Tolerance zones are located at true position.
Virtual condition
The virtual condition of a feature specified at MMC is a constant boundary generated by the collective effects of the MMC limit of size of a feature and the specified geometric tolerance. Features specified with an LMC modifier also have a virtual condition.


this amazing
ReplyDeletegood information.
ReplyDeleteGOOD AMAZING AND INFORMATION .....
ReplyDeleteThank you for the nice post and precious information. The way you explained the topic is too easy and containing a lot of information so that any one can understand the engineering drawing and develop the basic view about the related topic. We are providing engineering services @ Attard Engineering for last 30 years. We are manufacturers of medium to high volume machined parts, in accordance with our customers exact specifications. With our experience and equipment we are able to offer quality products at a competitive price and delivery. Willing to work with you in coming future ...
ReplyDeleteFeel free to contact us @ CNC Engineering
good information.
ReplyDeletegood information for me and also others
ReplyDeleteIndian cutting tools is the world's leading supplier of thread cutting, thread rolling, threading tools, threading taps, thread cutting tools, cutting thread and thread rolling dies.
ReplyDeleteGear Shaving Cutters
Broach India - Techcellence is a leading manufacturer and exporter of broach, broaching machines and optimum quality industrial spline gauges in India.
ReplyDeletemanufacturer straight spline broaches
I am really enjoying reading your well written articles. It looks like you spend a lot of effort and time on your blog. I have bookmarked it and I am looking forward to reading new articles. Keep up the good work. Rejuvenation
ReplyDelete