Thursday, June 16, 2011

Kaizen (Continious Improvement)


Kaizen is a system of continuous improvement in quality, technology, processes, company culture, productivity, safety and leadership.

We'll look at Kaizen by answering three questions: What is Kaizen? What are the benefits of Kaizen? What do you need to do to get started using Kaizen principles?

Kaizen was created in Japan following World War II. The word Kaizen means "continuous improvement". It comes from the Japanese words 改 ("kai") which means "change" or "to correct" and 善 ("zen") which means "good".

Kaizen is a system that involves every employee - from upper management to the cleaning crew. Everyone is encouraged to come up with small improvement suggestions on a regular basis. This is not a once a month or once a year activity. It is continuous. Japanese companies, such as Toyota and Canon, a total of 60 to 70 suggestions per employee per year are written down, shared and implemented.

In most cases these are not ideas for major changes. Kaizen is based on making little changes on a regular basis: always improving productivity, safety and effectiveness while reducing waste.

Suggestions are not limited to a specific area such as production or marketing. Kaizen is based on making changes anywhere that improvements can be made. Western philosophy may be summarized as, "if it ain't broke, don't fix it." The Kaizen philosophy is to "do it better, make it better, improve it even if it isn't broken, because if we don't, we can't compete with those who do."

Kaizen in Japan is a system of improvement that includes both home and business life. Kaizen even includes social activities. It is a concept that is applied in every aspect of a person's life.

In business Kaizen encompasses many of the components of Japanese businesses that have been seen as a part of their success. Quality circles, automation, suggestion systems, just-in-time delivery, Kanban and 5S are all included within the Kaizen system of running a business.

Kaizen involves setting standards and then continually improving those standards. To support the higher standards Kaizen also involves providing the training, materials and supervision that is needed for employees to achieve the higher standards and maintain their ability to meet those standards on an on-going basis.

Kaizen Benefits:

Kaizen is focused on making small improvements on a continuous basis.

Kaizen involves every employee in making change—in most cases small, incremental changes. It focuses on identifying problems at their source, solving them at their source, and changing standards to ensure the problem stays solved. It's not unusual for Kaizen to result in 25 to 30 suggestions per employee, per year, and to have over 90% of those implemented.

For example, Toyota is well-known as one of the leaders in using Kaizen. In 1999 at one U.S. plant, 7,000 Toyota employees submitted over 75,000 suggestions, of which 99% were implemented.

These continual small improvements add up to major benefits. They result in improved productivity, improved quality, better safety, faster delivery, lower costs, and greater customer satisfaction. On top of these benefits to the company, employees working in Kaizen-based companies generally find work to be easier and more enjoyable—resulting in higher employee moral and job satisfaction, and lower turn-over.

With every employee looking for ways to make improvements, you can expect results such as:

Kaizen Reduces Waste in areas such as inventory, waiting times, transportation, worker motion, employee skills, over production, excess quality and in processes.

Kaizen Improves space utilization, product quality, use of capital, communications, production capacity and employee retention.

Kaizen Provides immediate results. Instead of focusing on large, capital intensive improvements, Kaizen focuses on creative investments that continually solve large numbers of small problems. Large, capital projects and major changes will still be needed, and Kaizen will also improve the capital projects process, but the real power of Kaizen is in the on-going process of continually making small improvements that improve processes and reduce waste.


Wednesday, June 15, 2011

Engineering Drawing

An engineering drawing, a type of technical drawing, is created within the technical drawing discipline, and used to fully and clearly define requirements for engineered items.

Overview:

Engineering drawings are usually created in accordance with standardized conventions for layout, nomenclature, interpretation, appearance (such as typefaces and line styles), size, etc. One such standardized convention is called GD&T.

Each field in the Fields of engineering will have its own set of requirements for the producing drawings in terms line weight, symbols, and technical jargon. Some fields of engineering have no GD&T requirements.

The purpose of such a drawing is to accurately and unambiguously capture all the geometric features of a product or a component. The end goal of an engineering drawing is to convey all the required information that will allow a manufacturer to produce that component.

Engineering drawings used to be created by hand using tools such as pencils, ink, straightedges, T-squares, French curves, triangles, rulers, scales, and erasers. Today they are usually done electronically with computer-aided design (CAD).

The drawings are still often referred to as "blueprints" or "bluelines", although those terms are anachronistic from a literal perspective, since most copies of engineering drawings that were formerly made using a chemical-printing process that yielded graphics on blue-colored paper or, alternatively, of blue-lines on white paper, have been superseded by more modern reproduction processes that yield black or multicolour lines on white paper. The more generic term "print" is now in common usage in the U.S. to mean any paper copy of an engineering drawing.

The process of producing engineering drawings, and the skill of producing them, is often referred to as technical drawing or drafting, although technical drawings are also required for disciplines that would not ordinarily be thought of as parts of engineering.


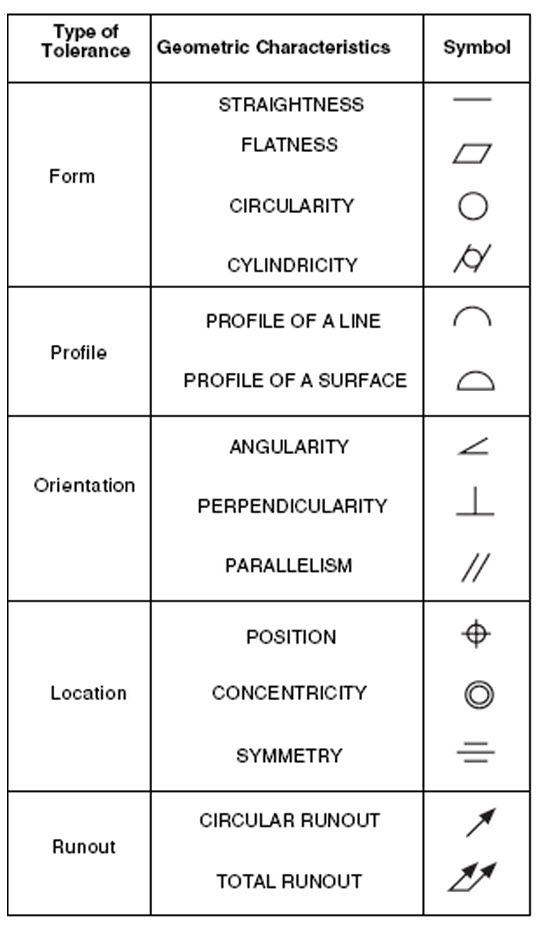
Sample engineering drawing and GD&T symbols:


Introduction to Geometric Dimensioning and Tolerance

GD&T is a symbolic language. It is used to specify the size, shape, form, orientation, and location of features on a part. And its basically a design tool. To apply GD&T properly one must have a good understanding of parts functional requirement in an assembly. Let us start learn the language of symbols.

GD&T Symbols

There are fourteen geometric characteristic symbols used in the language of GD&T. They are divided in to five categories namely form, orientation, location, runout, and profile.

In addition to above symbols there are five more modifying symbols used in GD&T.

GD&T-Modifiers-Symbols

We will discuss each of these symbols in detail on future chapters.

Let us now familiarize the feature control frame

GD&T-Feature-Control-Frame

Geometric dimensioning and tolerancing is applied on a drawing via these feature control frames. It’s a rectangle which is divided into compartments within which geometric characteristic symbol, tolerance value, modifiers, and datum references are placed. These feature control frames may attached below dimensions or to a datum reference or to a feature with a leader.

Let us now familiarize some of the common terms used in GD&T.

Basic Dimension

A basic dimension is a numerical value used to describe the theoretically exact size, profile, orientation, or location of a feature or datum target. Basic dimensions are used to define or position tolerance zones.

Datum

A datum is a theoretically exact point, line, or plane derived from the true geometric counterpart of a specified datum feature. A datum is the origin from which the location or geometric characteristics of features of a part are established.

Datum feature

A datum feature is an actual feature on a part used to establish a datum.

Feature

A feature is a physical portion of a part like hole, flat surface, ribs etc.

Feature of Size

A feature with size dimension, hole with diameter dimension is an example of feature of size.

Least Material Condition (LMC)

The least material condition of a feature of size is the least amount of material within the stated limits of size. For example, the minimum shaft diameter or the maximum hole diameter.

Maximum material condition (MMC)

The maximum material condition of a feature of size is the maximum amount of material within the stated limits of size, for example, the maximum shaft diameter or the minimum hole diameter.

True position

True position is the theoretically exact location of a feature established by basic dimensions. Tolerance zones are located at true position.

Virtual condition

The virtual condition of a feature specified at MMC is a constant boundary generated by the collective effects of the MMC limit of size of a feature and the specified geometric tolerance. Features specified with an LMC modifier also have a virtual condition.


CNC Measuring Instruments

The below listed instruments are base on Mitutoyo catalag

Vernier Caliper


FEATURES:

  • The thin blade type jaws fit into very small grooves and making previously difficult outside measurements far easier to obtain.
  • The OD measuring faces are carbide-tipped.
  • With depth bar.
  • With SPC data output.
  • Supplied in fitted plastic case.

Technical Data

Accuracy: Refer to the list of specifications. (excluding quantizing error for digital models)
Resolution*: 0.01mm or .0005"/0.01mm
Graduation**: 0.05mm
Display*: LCD
Length standard*: ABSOLUTE electrostatic capacitance type linear encoder
Max. response speed*: Unlimited
Battery*: SR44 (1 pc.), 938882
Battery life*: Approx. 3.5 years under normal use
*Digital models **Analog models

Function of Digital Model

Origin-set, Zero-setting, Power On/Off, Data output, inch/mm conversion (inch/mm models)
Alarm: Low voltage, Counting value composition error


Outside Micrometer

FEATURES:

  • Hammertone-green, baked-enamelfinished frame.
  • Ratchet Stop or Friction Thimble for exact repetitive readings.
  • With a standard bar except for 0-25mm model.

Technical Data

Graduation: 0.01mm, 0.001mm
Flatness: 0.6µm for models up to 300mm
1µm for models over 300mm
Parallelism: (2+R/100)µm, R=max. range (mm)
Measuring faces: Carbide tipped

Note:Models with a range up to 1000mm are available


Digi Depth Vernier Caliper
FEATURES:

  • ABSOLUTE Digimatic Depth Gage can keep track of the origin point once set for the entire life of the battery.
  • Base and measuring faces are hardened and micro-lapped.
  • Optional wider extension base are available. (up to 450mm range models)
  • With SPC data output.

Technical Data
Resolution: 0.01mm or .0005"/0.01mm
Repeatability: 0.01mm
Display: LCD
Length standard: ABSOLUTE electrostatic capacitance (electromagnetic induction)* type linear encoder
Max. response speed: Unlimited
Battery: SR44 (1 pc.), 938882
Battery life: Approx. 20,000 hours (3 years)* under normal use
Dust/Water protection level: IP67*
*Coolant Proof models

Function
Origin-set, Zero-setting, Automatic power on/off, Data output, inch/mm conversion (inch/mm models)
Alarm: Low voltage, Counting value composition error

Optional Accessories
959143: Data hold unit
959149: SPC cable with data switch (40” / 1m)
959150: SPC cable with data switch (80” / 2m)
05CZA624: SPC cable with data switch (40” / 1m)*
05CZA625: SPC cable with data switch (80” / 2m)*
*for IP67 models

Depth Micrometer

FEATURES:

  • Ø4mm measuring rod.
  • With measuring rod clamp.
  • With carbide-tipped measuring rod model is available.
  • With ratchet stop for constant force.

Technical Data
Accuracy: ±3µm for micrometer head feed
Graduation: 0.01mm or .001¡±
Flatness of reference face: 1.3¥ìm for 63.5mm width base, 2¥ìm for 101.6mm width base
Flatness of measuring rod face: 0.3¥ìm
Parallelism between reference face and measuring rod face:
(4+L/50)¥ìm, L=Max. measuring length (mm)
Measuring rod diameter: 4mm
*with carbide-tipped measuring rod


Dial Depth Vernier

FEATURES:

  • Easier and faster reading of dial.
  • Made of hardened stainless steed.
  • Base and measuring faces are hardened and micro-lapped.
  • Optional wider extension base are available.

Technical Data
Dial reading: 0.05mm or .001”
Base size: 100x6.5mm (WxT)


Vernier Depth Gage

FEATURES:

  • Made of hardened stainless steel.
  • Base and measuring faces are hardened and micro-lapped.
  • Optional wider extension base are available.(up to 450mm range models

Technical Data
Graduation:0.05mm,0.02mm or .001 in


Tubular Inside Micrometer

FEATURES:

  • With locking clamp.
  • Zero point can be readjusted by twisting the micrometer head sleeve. A key wrench is supplied.
  • Clear, crisp graduations on the satin chrome finished micrometer head.
  • Carbide-tipped measuring faces.
  • Supplied in fitted plastic case.Over 200mm/8in supplied in wooden case.

Technical Data

Graduation: 0.01mm or .001"


Bore Gages

FEATURES:

Mitutoyo offers a complete selection of Bore Gages,all of them with interchangeable anvils and necessary accessories to perform close tolerance ID measurements.
  • Most popular Bore Gages.
  • Carbide-tipped contact points for durability.
  • The dial indicator is fully protected by a rugged cover.
  • Optional extension rods can be attached for measuring deep holes.

Technical Data

Accuracy: 5µm / .0002”
Indication stability: 2µm / .00008”
Graduation: 0.01mm, 0.001mm, .0005" or .0001"

Optional Accessories
953549: 125mm / 4.92” Extension rod for 18-35mm / .7 -1.4" models
953552: 125mm / 4.92” Extension rod for 35-160mm / 1.4 - 6.5" models
953557: 125mm / 4.92” Extension rod for 160-400mm / 6.5 - 16" models
953550: 250mm / 9.84” Extension rod for 18-35mm / .7 - 1.4" models
953553: 250mm / 9.84” Extension rod for 35-160mm / 1.4 - 6.5" models
952361: 250mm / 9.84” Extension rod for 160-400mm / 6.5 - 16" models
953551: 500mm / 19.69” Extension rod for 18-35mm / .7 - 1.4" models
953554: 500mm / 19.69” Extension rod for 35-160mm / 1.4 - 6.5" models
953558: 500mm / 19.69” Extension rod for 160-400mm / 6.5 - 16" models
953555: 750mm / 29.53" Extension rod for 35-160mm / 1.4 - 6.5" models
953559: 750mm / 29.53” Extension rod for 160-400mm / 6.5 - 16" models
953556: 1000mm / 39.37” Extension rod for 35-160mm / 1.4 - 6.5" models
953560: 1000mm / 39.37” Extension rod for 160-400mm / 6.5 - 16" models


Vernier Height Gage

FEATURES:

  • The Light Weight Height Gage is designed for scribing from a vertical base or for small parts.
  • Stain chrome finished scales for glare-free reading.
  • Beam and slider are made of stainless steel.
  • Carbide-tipped scriber is provided.

Standard Scriber Provided
Carbide-tipped scriber (900173) and scriber clamp (901338)

Optional Accessories
953639: Holding bar for test indicator (length: 50mm)
900322: Swivel clamp used with holding bar


Tuesday, June 14, 2011

CNC Wire Cut

Wire EDM machine
Wire EDM machine
Gear cut by Wire EDM
Mechanical part cut by Wire EDM

Wire EDM cutting, also known as electrical discharge machining, is a process that uses an electrically energized thin wire to slice through metal. Wire EDM cutting uses rapid, controlled, repetitive spark discharges from the wire to the workpiece, thereby eroding the metal away. The workpiece must be electrically conductive.

Wire EDM cutting can provide high dimensional accuracy for close fitting parts. The process can make sharp inside corners.

Wire EDM can cut most any simple or complex 2D shape including cutouts and thin walls, intricate openings and sharp inside corners. Examples of a few types of parts that can be cut by wire EDM include:

Wire EDM cutting applies toWire EDM can cut material thickness from only a few thousandths of an inch to several inches. Custom tooling is generally not needed.

Cost optimization options for wire EDM cutting include:

  • Reducing cut surface area
  • Stacking parts during cutting (this is considered automatically by the eMachineShop CAD)
  • Minimizing the number of holes and cutouts
  • Creating holes by providing a small gap connecting the hole to the outer edge.

Wire EDM Design Considerations

    • Edges are smooth but matte.
    • Typical surface finish is between 16 and 64 microinches.
    • The edges of the finished work piece will have virtually no burrs.
    • Kerf width typically ranges from 0.001" to 0.012".
    • Sharp internal corners will be slightly rounded (typically with radius ~.008")

      Drilling


      Drill press
      Drill press
      Drilled hole in plastic
      Drilled hole in plastic


      Drilling is a cutting process in which a hole is made by means of a multi-point, fluted, cutting tool that rotates as it plunges into the material. Drilling on manual presses offers low cost for simple short runs. Drilling is primarily done on CNC machines including milling machinies and lathes. Drilling produces round holes, typically for machine screws and bolts. Drilling can process metals, hard plastics, wood and most other rigid materials.

      Cost reduction options for drilling include minimizing hole count, reducing hole depth and reducing the number of different hole sizes.

      Drilling Design Considerations

      • Avoid high ratios of length to diameter
      • Consider that high ratios of length to diameter complicate achieving high tolerance on the position of the exit side of the hole.
      • Consider specifying to drill from both ends when higher position tolerance is required.
      • For holes to be tapped, the drilled hole should be several threads deeper than the thread.


      CNC Wire Forming


      CNC wire forming shapes metal wire into a desired configuration using mechanical cams, arms and wheels under computer control.

      CNC wire forming allows to shape wire without expensive jigs and offers accurate repeatability and speed. Wire shapes achievable with CNC wire forming range from simple U shapes to springs to complex sculptures. Some shapes such as knots are impractical. Examples of parts made by CNC wire forming include coil springs, V springs, springs with unusual end formations, sculptures, wire mechanisms, etc. CNC wire forming can shape almost any type of metal wire. Custom tooling is generally not required in CNC wire forming.

      Cost optimization options for CNC wire forming include reducing shape complexity and reducing total length and diameter of wire.

      CNC Wire Forming Design Considerations

      • Consider that the straight wire is formed as it exits an orifice on a continuous basis, thereby imposing some restrictions on the possible shapes.
      • Consider the effect of spring-back and minor non-uniformity of the unformed metal in tolerancing the final shape.

      Note: This process is not currently supported by the CAD software.

      CNC Turret Punching


      Turret Punching Machine
      Turret Punching Machine
      Sheet metal enclosure cut via turret punching
      Sheet metal enclosure cut via turret punching
      Bracket cut by turret punching
      Bracket cut by turret punching

      CNC turret punching creates shapes in sheet material by successively punching a series of basic shapes such as circles and rectangles. The basic shapes are selected from a rotating turret under CNC control.

      CNC turret punching is a cost effective method for cutting sheet metal in moderate to long runs. Edges are usually very good due to the shearing action. CNC turret punching can produce 2D shapes including cutouts. Example applications include:

      Normally all the tooling needed are stock items but special tooling may be needed for inside angles less than 90 deg and unusual shapes. CNC turret punching is commonly applied to:

      Cost optimization options for turret punching include:

      • Replacing outside arcs such as rounded corners with chamfered corners
      • Reducing the number of different hole sizes
      • Minimizing use of complex curves
      • Use of hole sizes corresponding to stock tooling
      • Requesting custom tooling for high volume runs
      • For lowest cost use circles of inch diameter 7/64, 1/8, 9/64, 5/32, 11/64, 3/16, 13/64, 7/32, 15/64, 1/4, 9/32, 5/16, 3/8, 1/2, 1 or 2; inside arcs of inch radius 7/128, 1/16, 9/128, 5/64, 11/128, 3/32, 13/128, 7/64, 15/128, 1/8, 9/64, 5/32, 3/16, 1/4, 1/2 or 1; and limit outside arcs such as rounded corners.

      CNC Turret Punching Design Considerations

      • Avoid thin fragile shapes
      • Warping may occur if many holes are punched or much material is removed from the sheet
      • Minimize use of very small holes
      • Bottom side features may have a few thousandths of an inch more material than the top dimensioned side.
      • Some edges may show minor signs of the successive punching process, less so on the bottom side.